
Unkover your competitors’ Marketing Secrets
Say goodbye to wasting hours on competitor analysis by equipping your team with an AI-driven, always-on competitive intelligence platform.


Say goodbye to wasting hours on competitor analysis by equipping your team with an AI-driven, always-on competitive intelligence platform.

Stay Ahead with AI-DRIVEN Competitive Intelligence
Unkover is your AI-driven Competitive Intelligence team delivering critical updates about your competitors the moment they happen:
Track your competitors website changes
Why spend all day stalking the competition when you don’t have to?
With Unkover, you’ll know instantly when your competitors tweak their messaging or shake up their pricing. No more endless scrolling through their sites or second-guessing your strategies.
Let us do the heavy lifting for you, ensuring you’re always in the loop by notifying you the moment a critical change happens on your competitor’s pages.
Sit back, relax, and keep winning—Unkover makes sure you’re not just in the game, you’re always a step ahead.


Read your competitors emails
Companies love updating their customers and prospects about relevant news, product updates, and special offers.
That juicy info from your competitors? It’s yours too. Unkover will automatically capture all their emails and bring them right to your doorstep—accessible to your entire team, anytime.
[COMING SOON: Our fine-tuned AI will sift through these emails, extract key information and send them over to the best team within your org. Less noise, more signal!]
We hear you! Unkover’s goal is not to flood you with tons of data points that no one in your team will ever read. We gather competitive intelligence from thousands of data sources and use AI to highlight actionable information to the right team in your company.
Say goodbye to noise. We’re 100% signal.
ROADMAP
We’re excited to get Unkover in your hands as soon as possible and keep building the best competitive intelligence tool with your precious feedback. The roadmap for the next few months is already exciting, so take a look!
While we build and deliver, here’s our promise to you: as an early tester and customer, you’ll lock in an exclusive bargain price we’ll never offer again in the future.

Spy on your competitors’ full marketing strategy: social, ads, content marketing, email flows, and more.

Track competitive Win/Loss analysis and build battle cards. Get alerted at every pricing change.

Get immediate alerts when competitors announce new features or major releases. Identify strengths and weaknesses from online reviews.

Get the competitive intelligence you need where you need it: Slack, eMail, MS Teams, Salesforce, Hubspot, Pipedrive and more.
slack integration
Unkover’s Slack integration lets you keep your whole team up to speed with your competitors’ updates.

Join now to lock in an exclusive 50% lifetime discount
For startups and small teams, it’s the essential toolkit you need to keep an eye on a select few competitors.

Up to 5 competitors

50 pages monitored

10 email workflows

3-day data refresh
$39
/per month
$ 79
50% discount
Billed annually
For growing businesses, it allows you to monitor more competitors, pages, and email workflows.

Up to 10 competitors

100 pages monitored

20 email workflows

1-day data refresh
$79
/per month
$ 159
50% discount
Billed annually
For large companies, it is tailored to meet the needs of multiple teams needing granular insights.

Custom number of competitors

Custom number of pages monitored

Custom number of email workflows

Hourly data refresh
Custom price
Billed annually

Workflows can make or break your business.
If you’re struggling to design a HubSpot workflow specific to your marketing and sales needs, you’ve come to the right place.
In this guide, let’s explore seven must-have HubSpot workflow examples that streamline your sales process, improve communication between your sales reps, and boost conversions.
A HubSpot workflow is a series of automated and repeated actions that trigger based on a user’s behavior or demographic and firmographic information.
For example, if you want to nurture prospects who downloaded a lead magnet, you might include the following emails in the workflow:
PDF download of lead magnet > after 1 day > relevant resources (e.g., blog posts, webinars) > after 3 days > free trial > after 1 day of signing up > onboarding

Instead of manually sending every single email to every single contact, this lead nurture workflow sends them on your behalf, on autopilot.
The most obvious benefit of using a HubSpot workflow is the amount of time saved.
Since you no longer perform routine tasks manually, you free up your schedule for more high-impact activities, such as maintaining client relationships and overcoming customer objections in important deals.
Other benefits of using workflows include:
Boosting productivity: Most marketing automation platforms offer plug-and-play workflow templates. You can quickly create them without starting from scratch.
Accelerating revenue: Productivity leads to a positive impact on your bottom line. In India, companies that improve their sales productivity drive up to 30% of revenue growth.

Improving consistency: Never underestimate brand recognition. Companies that maintain a consistent brand across channels increase revenue by up to 23%. Stick to consistent sales messaging to boost brand recognition and sales.
Eliminating human error: The average employee makes 118 mistakes a year. Since processes are automated in workflows (and little to no human effort is required to maintain them), you reduce the likelihood of manual errors.
Increasing efficiency: Workflows simplify tracking. Easily track the results of your marketing and sales automation and draw insights to plan future campaigns.
Now that you know the key benefits of using HubSpot email workflows, you’re ready to learn more about them.
Before you think about converting leads into customers, you need to start from the top. Let’s look at these three HubSpot workflow examples that leave a powerful impression on new subscribers.
The welcome email sets the tone for the entire course of your relationship with customers.
In this email, share additional resources, exclusive offers, or more information about your product with subscribers. You can even lay out the next steps subscribers can take to get the most out of your product.
Here’s a workflow that automatically sends a welcome email after users sign up for an email mailing list.
[Triggers workflow] Forms submission for “Join email list”
[Email 1] “Welcome to [Startup]”
{wait} 1 day
[Email 2] “A welcome video from founder, [Name]”
A quick note of advice, ensure that you’re targeting the most profitable customer segment in your marketing campaigns before setting up the workflows.
Here’s a quick way to ensure that your ideal customer profile (ICP) is up to date:
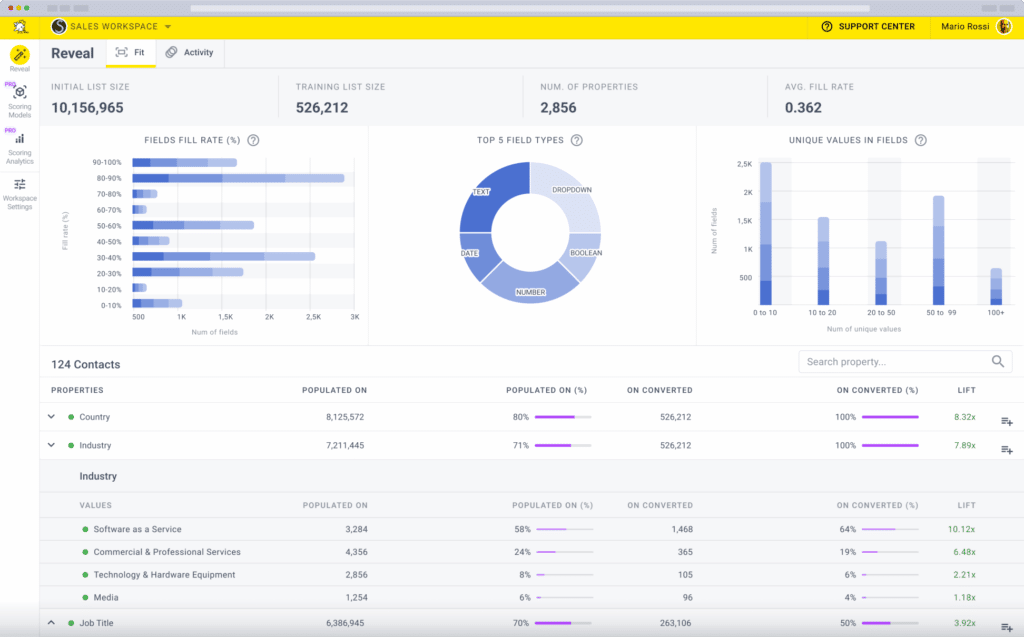
Breadcrumbs Reveal will analyze your entire customer data and highlight the specific attributes and actions that deliver the biggest revenue. You’ll end up with a dashboard like this:

Review the trends over time, countries and industries you should target, and high-intent actions customers perform the most on your website or product. Update your ICP accordingly.
Reveal is included in all plans. Grab your free plan on Breadcrumbs to validate your ICP today.
96% of visitors that arrive on your website for the first time are not ready to buy.
These first-time visitors rarely make purchases but may provide their contact information in exchange for valuable content.
What do we mean by valuable content?
Essentially, it’s content that directly addresses customers’ struggles at a specific point in the customer journey. This could be a worksheet for a high-intent keyword, a webinar related to their problem, or case studies featuring customers in similar industries.
… or all of the above in a lead nurturing email series.
Here’s how it might look in the form editor:
[Triggers workflow] Form submission for “Download your free worksheet!”
[Email 1]: “Here’s your free worksheet!”
{wait} 3 days
[Email 2]: “We built a product to solve [Problem]. Give it a whirl here!”
[Action] Set property value: started free trial = yes
{wait} 3 days
[Email 3]: “5 steps to make the most of [Product]”
{wait} 5 days
[Email 4]: “Your personal webinar invite to [Webinar]”
{wait} 5 days
[Email 5]: “How [Happy Client] increase its revenue by 56% using [Product]”
Personalization raises revenue by 10-15%. Consider adding the if-then branch action to direct leads to different routes based on their behavior.
Your unengaged contacts are probably on the fence about your product.
There are a variety of factors that contribute to their lack of inactivity, including features and needs and budget, and trust.
To re-engage these cold leads, refer to the potential customer objections in your sales battle cards and plonk them right in a simple workflow like below:
[Triggers workflow] No login in a week
[Email 1]: “Your questions answered about [Product]”
{wait} 1 day
[Email 2]: “See what customers like [Company] have to say about [Product]”
{wait} 5 days
[Email 3]: “A personal note from the founder (PLUS a special offer)”
Don’t skip the re-engagement workflow. Companies that overcome client objections boast a 64% close rate.
You’re about halfway through nurturing the prospective customers. These two HubSpot workflow examples show you how to get meaningful results in your sales pipeline.
Marketing qualified leads (MQLs) are more likely to become paying customers as the marketing team has vetted them.
This group of leads usually consume tailored content, such as pain-point-driven blog posts and product-based emails.
Note the workflow below that shares additional content to nurture them across the marketing funnel.
[Triggers workflow] Form submission: “Subscribe to our email newsletter!”
[Email 1]: “A quick welcome”
{wait} 1 day
[Email 2]: “Our most-read resources”
{wait} 1 day
[Email 3]: “How can we help?”
[Email 4]: “(New article) [Title]”
[Action] Set property value: Lifecycle Stage = “Marketing Qualified”
Align with the sales team to determine who makes a MQL.
Marketers and sales should know the demographic and firmographic data of these leads. Only then can both teams nurture and convert them into sales-qualified leads (SQLs) in an organized manner.
Product-qualified leads (PQLs) sit between MQLs and SQLs. These are the leads who have experienced the aha moment from your product in a free trial or freemium.
In this stage, work on improving user activation. Your emails should consist of educational product-led onboarding tips (or steps) to help leads recognize the key features and benefits of the product.
Here’s a rough workflow to show you what we mean:
[Triggers workflow] Form submission: “Starts free trial”
[Email 1]: “Welcome to [Product]!”
[Email 2]: “5 easy ways to use [Product]”
[Email 3]: “You’re 50% done. Complete the remaining steps”
[Action] Set property value: Lifecycle Stage = “Product qualified”
Again, focus on personalization. You can nudge users to complete specific actions based on their role, milestones, and behavior.

Salesforce is one of the most high-powered sales and CRM-focused SaaS tools on the market…

Every good sales team needs a great customer relationship management (CRM) tool backing them up. …

Over the past decade, we’re sure that you’ve noticed that your marketing tech stack options…
A sales pipeline overflowing with qualified sales leads (SQLs) is pointless if they don’t convert. The key to closing these high-intent leads is to catch them at the right time. Let’s go through these two HubSpot workflow examples to speed up the sales process.
No lead is equal.
At this stage, you have two goals: identify the SQLs and notify the sales team.
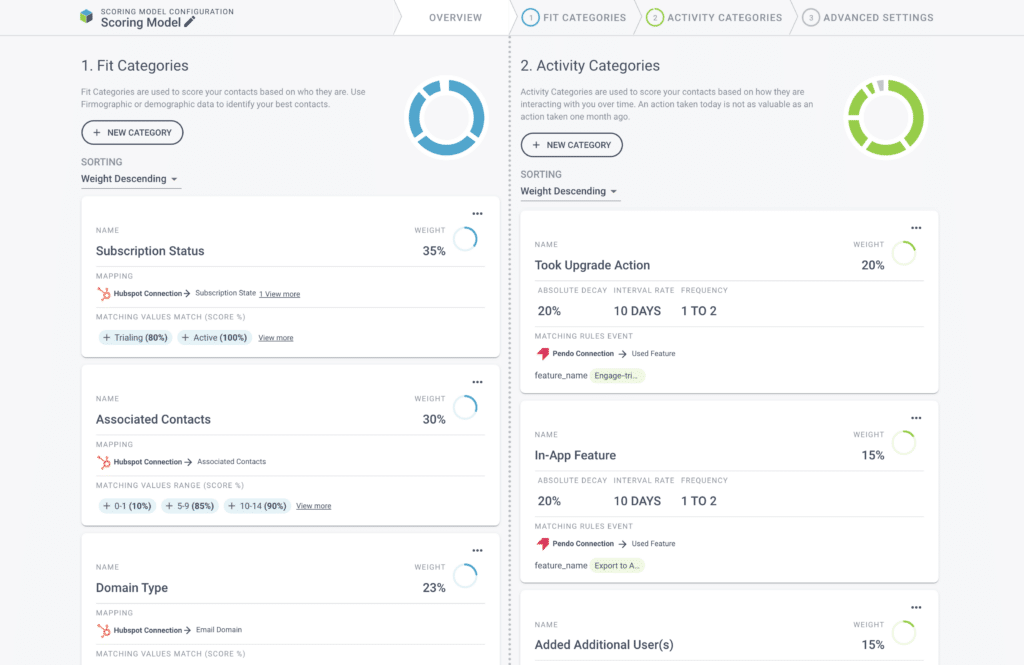
First, integrate HubSpot with an advanced contact scoring tool like Breadcrumbs to score your leads at a granular level:
Breadcrumbs will send all scoring information back to HubSpot, alerting the sales team with an app notification that your hot leads have hit the predefined scoring threshold.

You can use our lead scoring tool for all qualified leads. Customer success teams can also use it to identify customers with cross- and upsell potential.
Grab your free plan on Breadcrumbs today.
After that, create a workflow that alerts the sales team:
[Triggers workflow] Lead joins Smart List "Sales Qualified Leads"
[Action 1] Set property value: Lifecycle Stage = Sales Qualified
[Action 2] Send internal notification to #saleschannel on Slack
That way, everyone skips the guesswork and surfaces the most sales-ready leads, increasing the likelihood of converting them to customers.
It takes around 18 attempts to connect with a buyer.
Whether you run a small- or large-scale sales team, you want to be sure that you assign the most suitable or experienced sales rep to the deals.
Imagine assigning a sales rep, who’s only sold to manufacturing clients all this time, to the retail industry. That would be a huge mistake.
Here’s an internal workflow you might use to notify each sales rep:
[Triggers workflow] Lead joins Smart List "Sales Qualified Leads"
[Action 1] Set property value: Lifecycle Stage = Sales Qualified
[Action 2] Send email notification to lead owner in CRM
This workflow automatically creates internal notifications and ensures that no leads are left behind.
Breadcrumbs gather all your customer data on one platform. Grab your free plan to quickly identify sales-ready leads, streamline sales process, and accelerate revenue today.
A HubSpot workflow is a series of automated actions that triggers based on a user’s behavior or demographic and firmographic information.
Start from scratch, center on a date, and center on a date property.
This depends on your plan. The Marketing Hub Professional plan offers up to 300 workflows, whereas Marketing Hub Enterprise offers up to 1,000.
Sequence is for sales emails. You can send a series of email templates after enrolling contacts manually. You can also unenroll them automatically once they reply to your email or book a meeting.
On the other hand, workflow is for marketing emails. You can either enroll contacts manually or automatically through pre-defined enrollment triggers. Unlike sequence, workflow doesn’t let you unenroll contacts automatically.
In your HubSpot account, click Automation > Workflows > Create workflow.
Choose a template or create from scratch.
If you pick the latter, click [object]-based to determine the type of records you want to enroll in the workflow (e.g., deals, contacts, subscriptions). Select the workflow type (blank, scheduled, specific data or contact date property). Edit the workflow name and description and click Save.
Click Set up triggers to decide your enrollment trigger(s). Select filter type > Apply filter. Add more triggers as you desire.Click the + plus icon to select an action and click Save. Add more actions as needed.
Select Settings to manage your workflow’s settings. For example, click the Notifications tab if you want to alert users via email when a workflow’s enrollment rate increases or decreases beyond a predefined percentage.
In the upper right corner of the dashboard, click Review and publish to set the workflow live.